
To schedule and create automatic System Restore on Windows, you can use Task Scheduler, an integrated tool in Windows for automating tasks.
Here are the steps to schedule System Restore (for example), on the 10th and 20th of each month:
1. Open Task Scheduler
- Type “Task Scheduler” in the Windows search box and open the application
2. Create a New Task
- In Task Scheduler, select “Create Task” from the “Action” menu in the upper-right corner
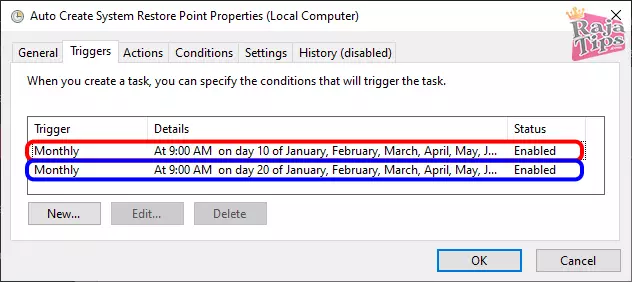
3. Set Triggers
- On the “Triggers” tab, click “New“
- Under “Begin the task“, select “On a schedule“
- Choose “Monthly” and check for every month
- In the “Days” section, enter 10 and 20 (or as you wish)
- Set the desired time to run the task
- Click “OK” to save the trigger settings
If you set multiple dates and one of them is not running, then you have to create more than 1 triggers and set each one to a different date
💡 For example: I set the 10th and 20th of every month to create restore points), but the restore point on the 20th does not run, then the triggers must be created separately
4. Set Actions
- Go to the “Actions” tab and click “New“
- Under “Action“, choose “Start a program“
- In “Program/script“, enter
powershell.exe - In “Add arguments (optional)“, enter this PowerShell command to create a restore point:
-ExecutionPolicy Bypass -Command "Checkpoint-Computer -Description 'Automatic Restore Point' -RestorePointType 'MODIFY_SETTINGS'"- Click “OK” to save the action settings
5. Set the Highest Privileges
- To avoid failure, you must perform this task with the highest privileges. Simply go back to the “General” tab and check the “Run with highest privileges” option under “Security Options“
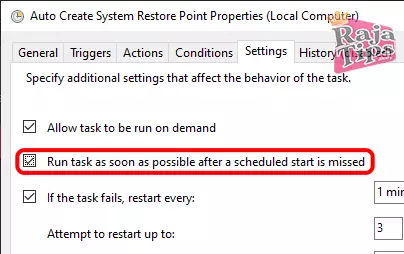
6. Configure Additional Settings
- Explore the “Conditions” and “Settings” tabs to adjust additional options as needed
- For example, if you know that the PC does not always turn on at the task’s due time, then you need to check the option “Run task as soon as possible after a scheduled start is missed” in the “Settings” tab
7. Save and Enable the Task
- Provide a name for your task and select “OK” to save
- Ensure that the task you created is in the “Enabled” status
Change Metadata with ExifTool: Quick, Easy Batch Edits!
Please note that to execute this task, your computer must be on at the scheduled time.
Also, make sure that System Restore is enabled on your system.
If not, you need to activate it through the Control Panel in the System Properties section.
If you encounter difficulties or need further assistance to create automatic System Restore on Windows, feel free to ask!


43 Pro Midjourney Prompts: Uncover the Secret to Creativity!
Script : Definition, Types, Examples & How to Create Them
7 Steps How To Buy Bitcoin on eToro – Act Fast!
49 Stunning Leonardo AI Prompts That Will Blow Your Mind